


Implantation of cardiac implantable electronic devices (CIEDs) remains one of the core skills of cardiologists; most cardiology trainees will require at least basic skills in permanent pacemaker (PPM) implantation.1 The aim of this article is to provide a guide to the techniques of venous access – the first and important part of the implantation procedure. The bulk of the provided instruction is based on our pacing lab experience and references are provided, where necessary, to describe techniques utilised in other centres. No article can be totally comprehensive and cover all the subtleties of a procedure. Like for any practical skill, it is possible to give only the core concepts in writing, and nothing can replace hands-on training supervised by an experienced implanter in a pacing theatre.
Patient preparation
Venography
The arm venogram is helpful in defining the venous anatomy: it can facilitate the central venous access when the access cannot be easily obtained using solely bony/fluoroscopic landmarks. Peripheral venous access is a mandatory part of preparation for CIED implantation as it is used for prophylactic antibiotics and intravenous sedation/analgesia. To make it suitable for venography, we routinely insert a large (at least 20 G) cannula in the antecubital fossa on the side of the planned implant. Some operators perform venography routinely; others reserve it for cases with difficult access. The rationale behind routine venography is checking for venous anomalies before prepping and draping the patient, as findings may influence the access site selection. The incidence of left-sided superior vena cava (SVC) varies from 0.3% in general population to 4.3% in patients with congenital heart disease.2 It typically drains into the right atrium (RA) through the dilated coronary sinus. The leads can still be passed into the RA and right ventricle via this route, but in, cases of multiple leads/complex devices, a right-sided implant accessing the heart via the right-sided SVC may be preferred. Rarely, a persistent left-sided SVC may be present with an absent right-sided SVC.
Venography is useful:
- when the first operator has limited experience in CIED implantation;
- when adding/removing pacing leads on the same side (we routinely obtain a venogram before scheduling a lead revision/extraction/device upgrade);
- in patients with high body mass index (BMI), as the axillary vein can have a more cranial position;
- in the elderly (as anatomy can be distorted);
- in patients taking anticoagulation/dual antiplatelet therapy (to keep the number of puncture attempts and bleeding risk to a minimum); and
- when a problem on the implant site (musculoskeletal pathology, previous surgery, lung pathology affecting lung volume) is suspected.
Drawbacks:
- prolongation of the procedure by a few minutes;
- risk of reaction to contrast; and
- risk of contrast nephropathy (increased in hypovolaemia, impaired kidney function, older age, heart failure, concomitant nephrotoxic medications), although as little as 10–20 ml of contrast medium is used.3
Hydration
Patients are often relatively dehydrated before the implant procedure due to staying nil by mouth. In a sedated patient, this can cause low central venous pressure with a collapse of the target vein, hampering the venous access. We encourage the drinking of clear fluids up to 2 hours before the implantation. Administering intravenous fluids before and during implantation may facilitate the access by distending the veins in hypovolaemic patients.
Positioning
The appropriate positioning of the patient is important. More than one pillow under the patient’s head may encumber the venous access (especially venepuncture). Placing a wedge under the legs and tilting the head down improves central venous filling, facilitates the venepuncture and decreases the risk of air embolism.4
Implant site
The most common site for CIED implantation is the left infraclavicular region. It provides a more natural pacing lab setup for right-handed operators and it is also easier to position the leads (especially the RA lead) from left-sided access. There may be a good reason to implant the CIED on the right side – for example, previous clavicular subclavian fracture, central venous occlusion or a recent removal of infected system on the left, but handedness is usually not a determining factor.5 In the right-sided approach, the peel-away sheath may need to be manually bent due to close proximity to the bend of subclavian vein. Also, shorter leads are usually required in right-sided access.
Sedation
The choice of sedation is often be determined by local guidelines/practice. We usually perform subcutaneous implants under nurse-led sedation and subpectoral implants under anaesthetist-led sedation. The procedural sedation principles outlined by the British Heart Rhythm Society and Academy of Medical Royal Colleges in their ‘Report on Safe Sedation’ are generally followed in the UK.6
Surgical aspects
Local anaesthesia
Local anaesthetic is infiltrated into the skin and subcutaneous tissue along the length of the intended incision as well as deeper to the intended pocket site. Lidocaine is currently the most widely used agent. Apart from systemic toxicity, large doses can promote bleeding as lidocaine has vasodilating properties. Lidocaine without adrenaline has traditionally been used in cardiac patients to avoid proarrhythmia, although with judicious use of the local anaesthetic this risk is small. The maximum recommended dose of plain lidocaine is 3 mg/kg or a total of 200 mg in Europe and 4 mg/kg or a total of 300 mg in the US.7
Incision
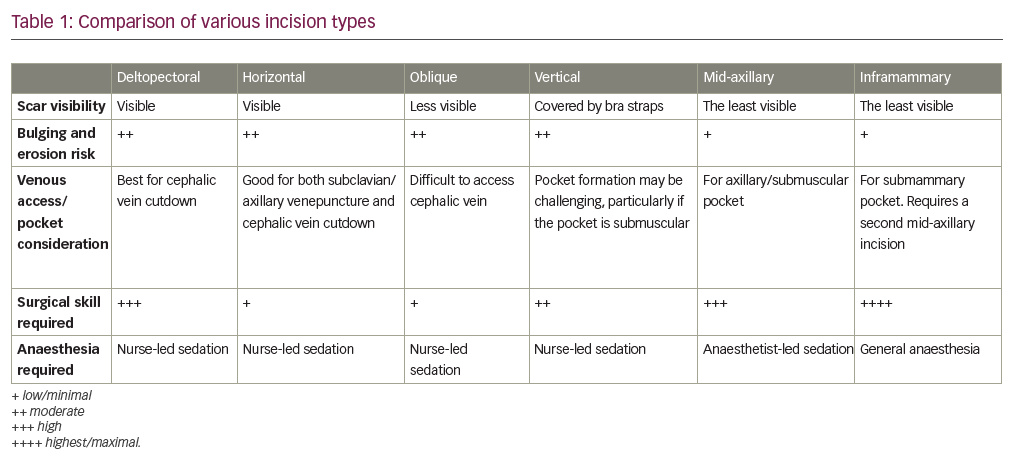
Three types of incisions are commonly used for CIED implantation in the pectoral area (Figure 1).5 Most operators will develop a preference for one of these. Each has advantages and disadvantages (Table 1) and the way an incision is made can determine the ease of implantation. A poorly made incision can hamper the access to the vein, make pocket formation problematic and lead to a poor cosmetic result. The total length of the incision (commonly 3–4 cm) will vary according to the size of the device and subcutaneous layer thickness – the thicker it is, the longer an incision may be required.
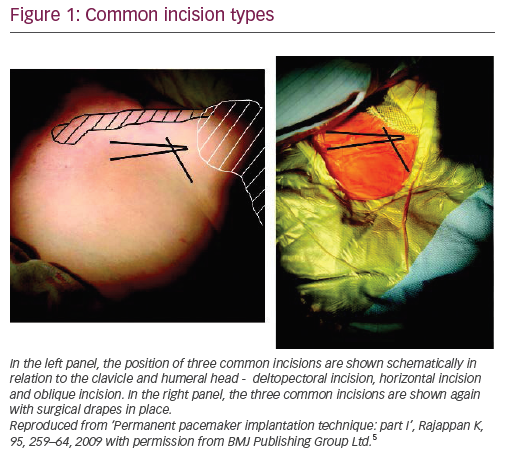
The deltopectoral incision is made in the deltopectoral groove (the indentation between the clavicular head of the pectoralis major medially and the deltoid laterally), starting about 1 cm below the clavicle. It provides the easiest access to the cephalic vein but may limit the access to the subclavian vein. It may be more difficult to make a subpectoral pocket from this incision. The pocket needs to be made quite medially to the incision to avoid generator migration into axillary area. The horizontal incision starts 1–2 cm below the junction of middle and lateral thirds of the clavicle and crosses the deltopectoral groove by about 1 cm in a lateral direction. It allows access to both the cephalic and subclavian veins and can be used for both subcutaneous and subpectoral pockets. The oblique incision is made parallel to and approximately 1–2 cm below the lateral third of the clavicle. It is close to the horizontal incision, but is more parallel to Langer’s lines and hence may give a better cosmetic result. However, it may be difficult to access the cephalic vein from this incision.
Pocket formation
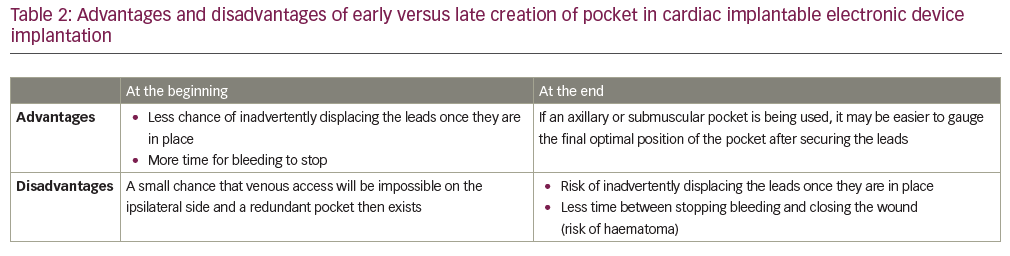
Most operators will make the pocket at the start of the procedure before any wire or lead is inserted, but in some cases shaping it at the end of the procedure once the leads are secured may be advantageous. Table 2 reflects these advantages. Although the pocket can be formed in the axilla (in children and patients with little soft tissue in pectoral area), in the abdomen (for epicardial or femoral systems) or under the breast (submammary implants), the most common site is the infraclavicular region.
A subcutaneous pocket at the level of the prepectoral fascia is used in the majority of patients having a transvenous CIED implant. We use a self-retained retractor to elevate the skin after incision and dissecting scissors to dissect the subcutaneous tissue bluntly. Once the prepectoral fascia is reached, the pocket is shaped by using 1–2 fingers, gently separating tissues medially and caudally. In young, muscular patients this plane may be fairly tight and significant effort may be required to separate the tissue layers, whereas in older patients it often spreads apart with minimal effort.
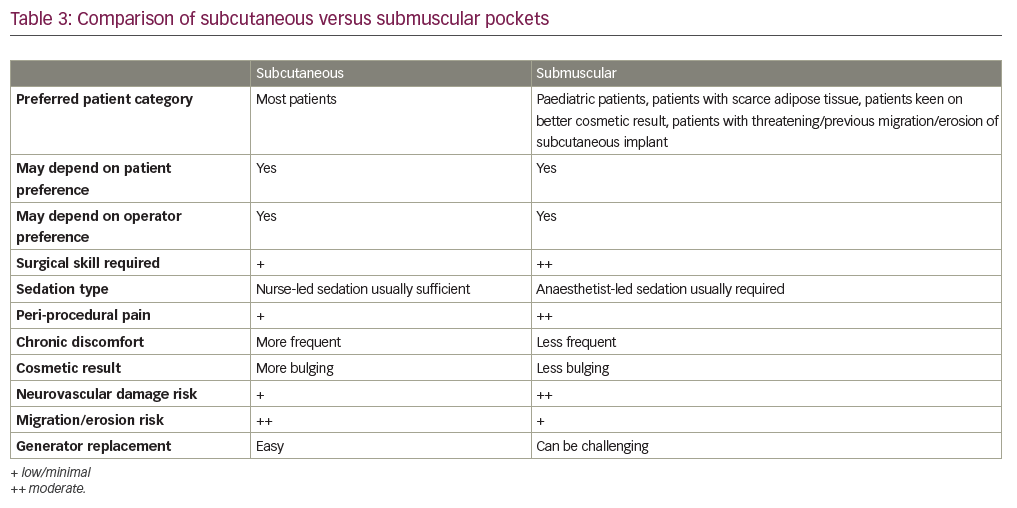
Patients with scarce subcutaneous tissue may benefit from having the device placed in a submuscular pocket to provide better protection against erosion or from pain caused by the device abutting against the deltoid muscle or the clavicle, as well as to improve the cosmetic appearance of the implant. This can be either an intramuscular pocket between the pectoralis major and minor or a subpectoral pocket below both the pectoralis major and minor and above the ribcage. A submuscular pocket is formed by a shallow incision in the pectoralis major muscle and then blunt dissection, either through both muscle layers (subpectoral) or just down to the pectoralis minor (intramuscular, this plane can be difficult to identify). The differences between subcutaneous and submuscular pockets are highlighted in Table 3.
Central venous access techniques
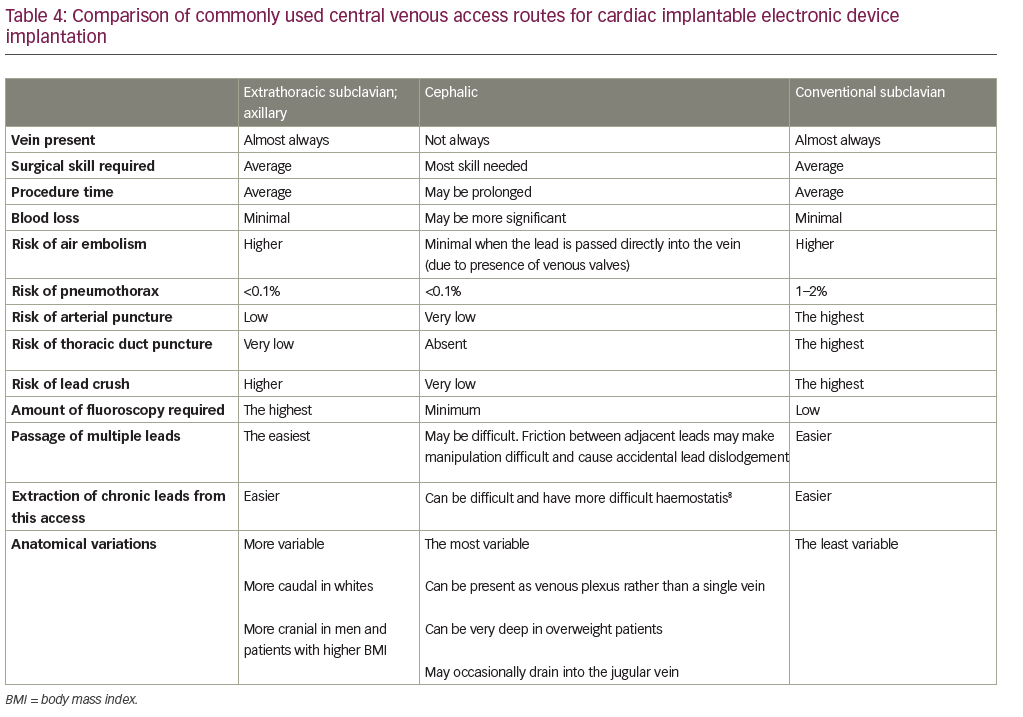
Techniques for central venous access relevant to CIED implantation can be divided into two categories: requiring direct visualisation of the target vein with subsequent venesection (most commonly the cephalic vein) and requiring venepuncture (most commonly conventional subclavian vein puncture, extrathoracic subclavian vein puncture or axillary vein puncture). Less commonly utilised approaches include access through the internal or external jugular vein with the lead tunnelled over/under the clavicle to the generator (useful when the subclavian vein is occluded and when a supraclavicular location for generator is preferred (e.g. it would be prudent to have as little hardware in the pectoral area as possible if ipsilateral breast surgery/radiotherapy is anticipated). It is possible to insert the leads via the iliofemoral vein as well; this approach was historically used when it was impossible to access the heart via SVC branches (this technique will be phased out as leadless pacemakers are now available, deliverable via the femoral vein). Each approach has its advantages and disadvantages (Table 4).8 Operators may have greater comfort and expertise with one approach or another, but they should be familiar with more than one technique to have a backup option if the favourite fails.
Extrathoracic subclavian vein puncture
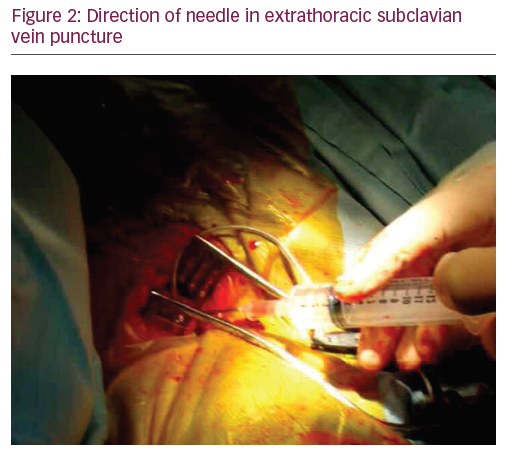
Extrathoracic subclavian vein puncture has become the most commonly utilised technique these days: it is easy and quick to perform and has a reasonably low overall risk of complications. A prospective randomised comparison of contrast-guided extrathoracic subclavian vein puncture versus cephalic cutdown conducted by Calkins et al. in 2001 demonstrated shorter procedure time and less blood loss in extrathoracic subclavian vein puncture with no difference in the complication rate.9 The puncture is made through the pectoral muscle, starting more medially than we do in conventional subclavian puncture and using a steeper needle angle, sometimes holding it almost perpendicular to the chest wall (Figure 2).
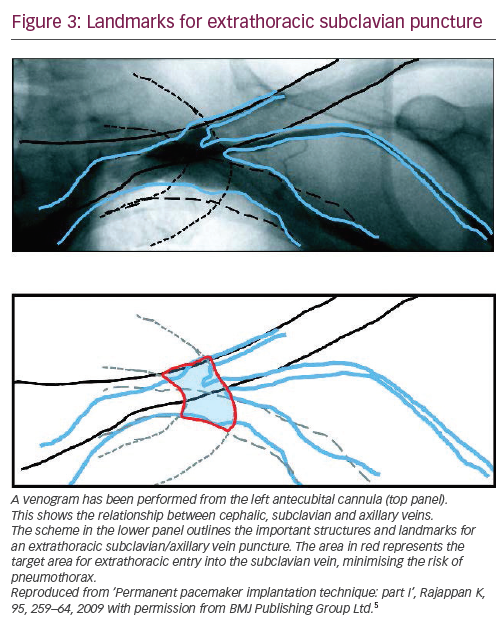
On fluoroscopy, the needle should always remain over the first rib in postero-anterior (PA) view and never cross its medial border (Figure 3).5
An 18-gauge needle is most commonly used for subclavian venous access, although some operators use a micropuncture needle. A 10 ml syringe containing 2–5 ml normal saline (sometimes lidocaine to anaesthetise deeper tissues) is attached to the needle. The needle is advanced gently aspirating with the attached syringe, aiming for the small safe area between lateral and borders of the first rib underlying the clavicle, until either dark non-pulsatile blood flashes into the syringe or the rib is struck. Once the rib is struck, the needle is gradually withdrawn while keeping the negative pressure in the syringe – this may bring the needle tip back into the venous lumen if both venous walls were punctured. If the first attempt fails, the safe area is mapped in cranio-caudal and medial-lateral directions (not crossing the medial border of the fist rib), until the vein is cannulated. Once the guidewire is inserted into the needle, fluoroscopy is used to confirm the course of the wire into the right heart chambers. It is essential to check whether the guidewire freely advances below the diaphragm. The needle is then removed and a short peel-away sheath is advanced over the wire with further removal of the wire and dilator. The sheath size will depend on the diameter of the lead or delivery system that we are going to insert through the sheath.
Difficulties/troubleshooting
- Aspiration of air into the syringe may indicate a lung puncture. Rare cases of inadvertent puncture of trachea and oesophagus have been reported as well. Alternative sources of air include a loose connection between the needle and syringe and aspirating the syringe when the needle tip is still too superficial.
- Aspiration of translucent yellow or milky white fluid (lymph) indicates a puncture of the thoracic duct.
- Aspiration of bright red blood into the syringe, the syringe plunger being pushed up by blood or pulsatile blood flow from the needle once the syringe is disconnected usually indicates an arterial puncture. However, pulsatile blood flow can be seen in a venous puncture as well when there is severe tricuspid regurgitation. On the other hand, arterial blood may not have pulsatile flow in severe hypotension and it may not have the bright red colour in severe hypoxia. In these equivocal cases, running the obtained blood through an arterial blood gas machine can be helpful to differentiate between arterial and venous bloods.
- If the guidewire does not advance below the diaphragm, an inadvertent arterial puncture should be suspected and ruled out (a guidewire mispositioned into the left ventricle will have a posterior course in right anterior oblique/lateral views and the morphology of mechanical ventricular ectopy will be consistent with left ventricular origin). It is worth bearing in mind that, apart from the RA-to-inferior vena cava route, the guidewire (and long sheaths) may occasionally advance towards/below the diaphragm also through the SVC-to-azygous vein route.
- The guidewire and needle should be removed as soon as an arterial puncture is confirmed, with manual pressure applied and blood pressure monitoring for 5–10 minutes. If a dilator, a sheath or a lead is confirmed to be in the artery, it should not be removed without consulting a vascular surgeon first for endovascular versus surgical closure of the defect in the arterial wall.
- Occasionally, the guidewire may course superiorly into the internal jugular vein. It can usually be redirected into SVC using fluoroscopy. Pulling of the ipsilateral arm gently in caudal direction and supporting the guidewire underneath with a dilator may help to steer the guidewire towards the SVC.
- When the guidewire does not advance beyond the subclavian vein, venography should be performed through the peripheral cannula or directly through the needle to visualise the kinking or stenosis.
- If the guidewire or the sheath does not freely advance back and forth, then the risk of subclavian lead crush is high and a new puncture or a switch to cephalic cutdown needs to be considered.
- If there is ongoing bleeding from the puncture site(s), a purse-string suture can be applied around the leads once they are properly positioned.
Axillary vein puncture
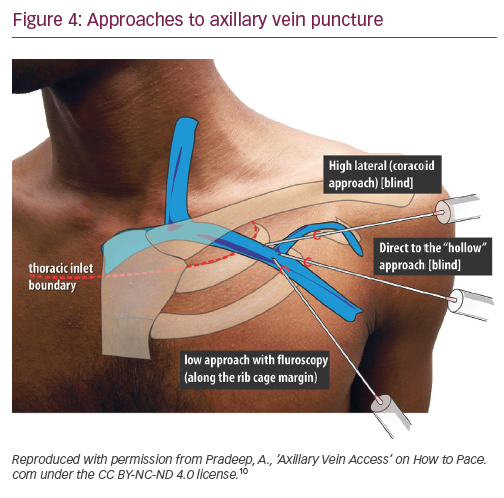
Axillary vein puncture is another approach allowing extrathoracic central venous access, with advantages similar to extrathoracic subclavian vein puncture. Some confusion exists between these terms in the literature – the segment of the vein overlying the first rib is interchangeably called the ‘extrathoracic part of the subclavian vein’ and the ‘axillary vein’. For clarity, we will call a puncture within the medial and lateral borders of the first rib underlying the clavicle ‘extrathoracic subclavian’ and a puncture external to the lateral border of the first rib ‘axillary’. The axillary vein begins at the lower border of the pectoralis major tendon as a continuation of the basilic vein. It courses under the pectoralis minor muscle at its tendinous insertion onto the coracoid process, then continues towards the clavicle, where it becomes the subclavian vein after crossing the lateral border of the first rib. It runs 1.5–2.0 cm medial and parallel to deltopectoral groove. The most common radiographic position of the axillary vein is over the anterior aspect of the third rib. A venogram is usually performed to the guide puncture as the axillary vein course can be quite variable, particularly in the cranial–caudal dimension. However, several blind and fluoroscopic techniques have been reported as well (Figure 4).10
Nickalls’ high lateral (coracoid) approach is a little lateral compared with the conventional subclavian puncture.11 The quoted point for the entry of the needle is 2–3 fingerbreadths inferior to the palpable tip of coracoid process slightly lateral to the lateral border of pectoralis minor;11 however, if this point is difficult to locate, then the lateral edge of the triangular delto-pectoral depression a couple of centimeters caudal to the clavicle10 or approximately the junction of the medial quarter and lateral three-quarters of the clavicle can be used.12 The needle is aimed towards the point below the medial end of the clavicle where the space between the clavicle and thorax becomes palpable, thus taking a relatively horizontal position. The tip of the needle enters the axillary vein just lateral to the first rib.
In Belott’s direct to ‘hollow’ blind approach, an incision about 6 cm long is made perpendicular to the deltopectoral groove at the level of the coracoid process.13 The incision is carried to the surface of the pectoral fascia and the pectoralis muscle and deltopectoral groove are directly visualised. The needle is advanced through the pectoralis major muscle at a 45° angle to the chest wall, keeping it 1.5–2.0 cm medial and parallel to the deltopectoral groove, until venous blood is aspirated. If the blind approach fails, then fluoroscopy is used to guide the needle to the first rib, using essentially the same needle angle and orientation. The needle should never be bent once the tip touches the first rib, which could result in inadvertent ‘jumping’ of the needle, causing trauma to the surrounding tissues. The needle should never be advanced past the medial border of the first rib. Maintaining the needle at a 45° angle helps to avoid the needle slipping under or over the first rib into the pleural space. The incision is long enough to visualise the deltopectoral groove, this allows a switch to cephalic cutdown easily if axillary vein puncture fails.13
In Burri’s low fluoroscopic approach, deltopectoral or oblique incision is used. With the needle pointing towards the head of the patient at a 60–90° angle to the skin, the vein is accessed at the surface of the pectoral muscle, just cephalad to the intersection of the inferior border of the second rib and the superior border of the third rib at the lateral ribcage margin.14 One of the drawbacks of this more caudal approach is that the needle tends to course through both the pectoralis major and the pectoralis minor muscles/tendon, placing the lead at risk for opposing muscle contractile forces, which increases lead fracture risk. Additionally, because the angle of entry into the vessel is steep, the lead may be subject to acute angles, also increasing the risk of lead fracture.
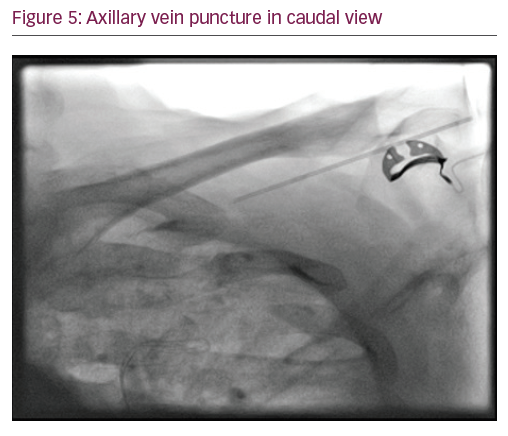
In Yang’s fluoroscopic approach using a 35° caudal view (Figure 5), an incision at the deltopectoral groove or just slightly medial and parallel to it is used. A micropuncture needle is inserted into the fascia/pectoral muscle at a shallow angle, keeping the needle almost parallel to the tissue and angled 60–70° from the caudal–cranial axis, thus following a course parallel to the axillary vein. The medial end of the axillary vein is usually located radiographically, just inferior to the intersection of the first rib and clavicle. Under anteroposterior fluoroscopy, the needle is angled towards the region of the first rib just inferior to the clavicle. The fluoroscopy camera is moved to about 35° caudal view, which allows one to see the anterior outline of the lungs and the needle as it approaches the lateral aspect of the first rib. In this view, the needle is advanced towards the target region, accessing the axillary vein on route towards the first rib.15
Cephalic vein cutdown
This technique is preferred by some operators because of the very low risk of complications and the best lead longevity (Table 4). It can be the essential route in failed subclavian/axillary venepuncture, patients with severe chronic pulmonary obstructive disease or pneumonectomy. It is worth noting, however, that extraction of chronic leads placed via this approach can be technically challenging and haemostasis after extraction can be difficult as well.8
The usual course of the cephalic vein is in the deltopectoral groove between the lateral aspect of the pectoralis major muscle and the medial border of the anterior deltoid muscle. It penetrates the clavipectoral fascia to join the axillary vein medial to the pectoralis minor muscle. It may occasionally run over the superficial surface of the clavicle to join the lower aspect of jugular vein: this can make advancing the leads difficult.
An incision is often created parallel to the deltopectoral groove, although horizontal incision is suitable as well. The vein is often hidden beneath the deltopectoral groove fat pad, caudal to the lateral end of the clavicle. The fat pad can be recognised by its pale colour as opposed to subcutaneous fat, which tends to be dark yellow. Dissection through this pad, between the pectoralis major muscle on the medial side and the deltoid muscle on the lateral side, will normally expose the cephalic vein.
Once the vein is identified, about 2 cm of its length is separated from surrounding tissues by careful blunt dissection. A small accompanying artery (pulsating when it is not stretched) is common. Also, there may be a plexus of veins instead of a single vein. The cephalic vein may lie deep in patients with high BMI and this can be another reason for using an alternative access approach.
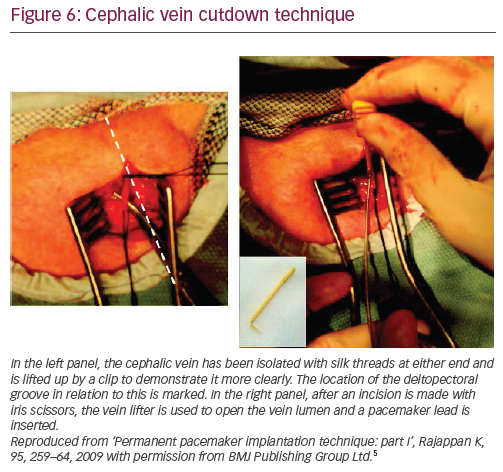
The vein is elevated by two non-absorbable sutures placed around the distal and proximal ends of the vein. The more distal (peripheral) one is tied into a knot and attached to a haemostat. A second haemostat is placed on the proximal (central) suture that is not tied. Care needs to be taken not to twist/overstretch the vein. Fine sharp scissors (iris scissors) or a number 11 blade can be used to nick the upper third of the vein and the created small window in the venous wall is secured using a vein lifter (Figure 6).5
Leads can be introduced into the cephalic vein directly with the help of the vein lifter. Alternatively, they can be inserted into the cephalic vein using a modified Seldinger approach, where the guidewire tip is inserted into the vein through the tip of the sheath dilator, 18-gauge needle or 16-gauge Angiocath™ (Becton, Dickinson and Company, Franklin Lakes, NJ, US).
Difficulties/troubleshooting
- If the cephalic vein is not found in the deltopectoral groove fat, then it usually lies just under the edge of the deltoid muscle.
- The cephalic vein cutdown approach may fail due to failure to properly isolate the vein, a small cephalic vein, venous stenosis, venous tortuosity, venous plexus or other anomalies.
- If the vein appears too small to allow placement of a second lead, a separate subclavian or axillary vein puncture could be performed for the second lead.
- If there is a venous plexus instead of single cephalic vein, it may be possible to cannulate the largest branch, but if they are all of similar small calibre it may be better not to attempt this route
- If the vein is severely damaged and bleeds despite keeping it elevated at the proximal end, it should be tied off proximal to the damage and subclavian or axillary venepuncture should then be performed. If the vessel is transected and the proximal end is lost below the pectoralis major, a digital compression can be tried to achieve haemostasis.
- If the guidewire tracks down the axillary vein it needs to be pulled back to the junction of cephalic and axillary veins and manipulated into the subclavian vein under fluoroscopy. Gently pulling the ipsilateral arm caudally may help to make the angle between cephalic and subclavian veins less steep.
- Obstruction of the lead movements by venous kinking or valves can be overcome by inserting a standard guidewire or a hydrophilic guide wire (e.g. Terumo wire [Terumo Corporation, Tokyo, Japan]).
Conventional subclavian vein puncture
Conventional (intrathoracic) subclavian vein puncture has lost its popularity in CIED implantations because of the high risk of periprocedural complications and subclavian crush later, but may still be in use in some centres. Although traditional teaching for a conventional subclavian puncture is to access the vein at the junction of the middle and inner third of the clavicle,16 this approach places the lead through the costoclavicular ligament or subclavius muscle,17 and, hence, at risk for lead compression. In a more lateral puncture, the lead rests in an area with a wider space between the clavicle and first rib18 and is less susceptible to compression. In fact, depending on the site of access, a lateral approach may provide entry into the axillary vein – an extrathoracic vessel – thus reducing the complications rate. As the subclavian vein heads medially, it joins the brachiocephalic (innominate) vein, which lies immediately posterior to the manubrium. The most consistent landmarks for directing the needle are the suprasternal notch and the lower one-third of the medial clavicle. The fluoroscopic relationship of the clavicle to the lateral subclavian vein varies depending on patient positioning and body habitus. Although some operators perform this puncture ‘blindly’ without any imaging, the fact that the subclavian often runs under the medial head of the clavicle means that fluoroscopy can be used to help guide the needle.
Subclavian vein puncture for CIED insertion differs from subclavian vein puncture for central venous line in the sense that puncture is made not through the skin and subcutaneous tissue but directly through the muscle. This means that although the muscle entry point is the same, the angle between the needle and the chest wall has to be reduced, i.e., the needle is less steep to allow for the fact that entry is up to several centimetres below the skin surface in some individuals. Once the muscle is pierced the needle is advanced in medial direction towards the suprasternal notch/lower one-third of the medial third of clavicle. Some operators describe ‘walking under’ the clavicle – the needle is kept transverse until it hits the clavicle, then it is slightly retracted and then advanced again with slightly steeper angle in order to pass under the clavicle. This reduces the risk of pneumothorax but increases the risk of subclavian crush.
Multiple lead access
Where access is required for more than a single lead, the operator has to make a decision how to best achieve this. With the cephalic vein, it is theoretically possible to provide unlimited venous access through the venotomy.19 Where the size of the vein allows, some operators will simply pass two (or more) leads via the cephalic vein without any guidewires or sheaths.
If the insertion of more than one lead via venepuncture is required, the number of punctures depends on how easy the first puncture has been and the perceived risk of haemothorax. If the first puncture is easy, making a second/third puncture is commonly performed as separate punctures make the manipulation of leads easier. If the first puncture is difficult and the pneumothorax risk is perceived to be high, then the cephalic vein can be utilised, or alternatively, the other lead(s) can be placed through the same puncture (however, this may hamper lead manipulation and increase the risk of bleeding from the larger hole created). If more than one lead needs be inserted into the heart using a single venepuncture, the introducer sheath mustbe large enough to allow retention or reintroduction of a guidewire in the initial sheath. A nice summary of various techniques for this can be found in an excellent book on device implantations by Russo et al.20


